


DYEING STREAK
Opening: a streak is not a dyeing failure, it is a visible one
Of all the defects a dyehouse meets, the streak is the one that starts the most arguments. The customer sees a dark or pale line running down the fabric and concludes that the dyehouse did not dye it evenly. In most cases the trace was already in the material — in the yarn, on the loom or knitting machine, in the pretreatment bath — long before the fabric reached the dye vessel.
The dye vessel behaves like a developer. Differences that were invisible in greige are pushed into visible bands by dye, heat and tension. With the same lot of greige, a gentle process leaves no streak; an aggressive process makes it jump out. Solving streaking therefore cannot start and end at the dyeing step. It has to be intercepted along the chain: yarn, fabric, pretreatment, dyeing — one level at a time.
Three things worth remembering:
1. A streak is a difference in dye uptake, not an operator error.
2. It is normally invisible in greige — only a trial dyeing makes it visible in time.
3. Stopping a streak at the yarn or the loom costs roughly a tenth of correcting it in the dye vessel.
1. What a streak is
1.1 Definition
A streak is a band of shade running parallel to the yarn direction that differs from the ground shade of the fabric. It may be darker than the ground (a "dark streak") or lighter (a "white streak", also called listing), and it ranges in width from a single yarn to several centimetres.
Along the warp it is a warp streak or vertical streak; across the weft it is a weft bar, a filling band, or barré. In mill usage "barré" is often applied loosely to any banded defect, so the direction should always be stated. This note takes the warp streak as its main line; barré forms by the same mechanism and is prevented the same way.
A streak is not the same thing as shade variation. Shade variation describes a difference between areas — head to tail, selvedge to centre, lot to lot. A streak describes a difference along a line. One is an area, the other is a line.
1.2 Five characteristics
| Directional | The band follows the yarn path — warp streaks run with the warp, barré runs with the weft. It never runs diagonally. |
| Defined edges | The two sides of the band are visibly separated rather than gradually blended. Width may equal one yarn (a "single-end streak") or reach several centimetres. |
| Long running | A warp streak usually runs the full length of the piece, sometimes the full lot; barré spans the full width. |
| Dark and light | Dark where uptake is high, pale where uptake is low. Both are the same defect seen from opposite sides. |
| Latent | Invisible in greige, visible after dyeing or finishing. This is the single most common reason a streak is wrongly attributed to the dyehouse. |
1.3 Telling it apart from other shade defects
Before discussing cause and responsibility, establish which defect you are looking at. Six are routinely confused.
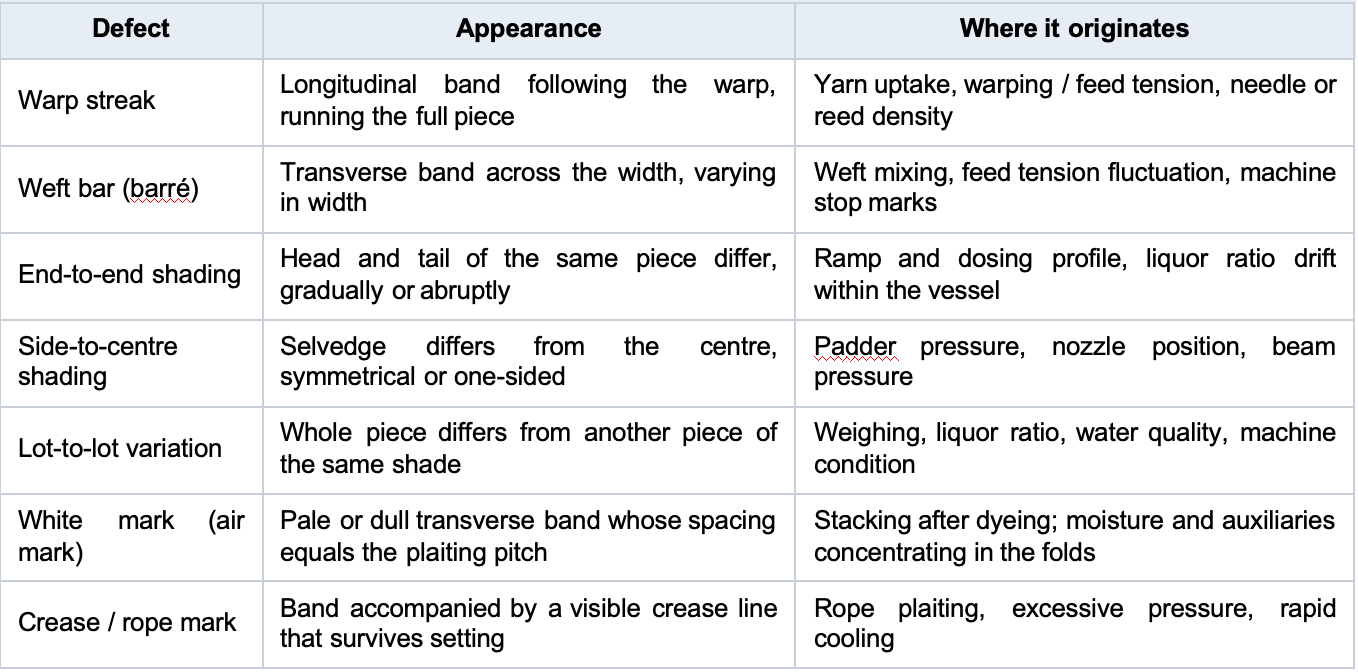
Air marks look almost identical to streaks, but they repeat at the plaiting pitch of the truck and appear only after setting. If the spacing matches the fold pitch, check storage before touching the dyeing recipe.
1.4 What it costs the order
• Cutting and shading. Left and right panels, or front and back, taken from different bands shade differently. This is the defect garment makers reject most often.
• Marker loss. Panels have to avoid the band, so consumption rises and the fabric cost per garment goes up.
• Worse after washing. Garment wash, stone wash and enzyme wash amplify streaking — typically discovered at final inspection.
• Inspection and claims. Most brands class a streak as a major defect: AQL downgrade, lot rejection, chargebacks, air freight to protect a delivery.
• Diffused accountability. Spinner, knitter or weaver, and dyehouse point at each other. The loss is finally absorbed by the weakest link, which is usually the delivery date.
2. How a streak forms
2.1 One relationship
Strip away the vocabulary and there are only two variables:
Streak = variation in dye uptake × development intensity
Variation in dye uptake — the greige's own ability to take dye differently along the band. It comes from the yarn and from weaving or knitting.
Development intensity — how hard the dyeing process amplifies that difference. It is set by ramp rate, salt and alkali dosing, liquor ratio, circulation and auxiliaries.
Development intensity — how hard the dyeing process amplifies that difference. It is set by ramp rate, salt and alkali dosing, liquor ratio, circulation and auxiliaries.
Dye uptake at any point on the fabric depends on three things: the accessibility of the fibre there (crystallinity, size of the amorphous regions, number of functional groups, residual size or oil), the local concentration and exchange of dye liquor, and the local temperature and pH. If any one of these changes discontinuously across the width, a band appears.
This also explains why a dyehouse feels unfairly accused. The uptake variation arrived with the greige; the dyehouse only decided how hard to develop it. But the dyehouse is also the last party able to make it visible and stop the loss before shipment.
2.2 Physical versus chemical streaks
Two streaks can look identical and have completely different origins. This is the most useful distinction in diagnosis.
| Type | Root cause | Typical appearance | Can dyeing cover it? |
| Physical | Yarn cross-section, twist, bulk or filament denier differ, so light reflects differently along that end | Faintly visible in greige; present before and after dyeing; most obvious in side light | Essentially no. It becomes more obvious in deep shades. Only the yarn can fix it. |
| Chemical | Crystallinity, orientation, functional groups or residual size and oil differ, so the fibre takes dye differently | Invisible in greige; appears only after dyeing; severity changes with dye class | Partly. Better levelling, dye selection and higher temperature reduce it. |
Practical meaning: a physical streak says "this end is not like the others" — go to the spinner. A chemical streak says "this end takes dye differently" — the spinner owns the cause, but the dyehouse can compress the difference. Both show up the same way when you unravel the fabric: one end noticeably darker or paler over its whole length.
2.3 Why sensitive shades expose it first
The same piece can run clean in ivory and show clear streaking in navy, black, olive, khaki or mid-grey. Three reasons:
• Higher dye concentration. In deep shades the small differences in uptake are multiplied by a large amount of dye on fibre.
• More components. Navy is typically built from two or three dyes with different exhaustion curves; the fastest one takes what it can and the difference becomes a band.
• Visual sensitivity. A ΔE shift is noticed sooner on deep and neutral shades — on grey or beige, 0.5 is already visible on the table.
Hence the shop-floor rule: screen greige with the most sensitive shade you have. If the greige runs clean in navy or mid-grey, the rest of the range is safe.
3. Causes
The list below follows the process. Items at the top are the main sources of streak; items further down are the amplifiers. In practice a visible streak is usually the sum of two or three items, which is why correcting a single step often only reduces it.
3.1 Yarn and fibre — the first source
| # | Cause | Mechanism and what you see |
| 1 | Lot mixing: yarns from different spinners, lots or production dates fed into the same lot | Polymerisation, drawing and finish oil differ between lots, so uptake differs by nature. The band has no fixed width, its position moves between pieces, and pieces from the same bath differ in severity. This is the first cause of streaking worldwide. |
| 2 | Uneven twist, bulk or denier — worn spinnerets or nozzles, drifting false-twist temperatures | Twist changes bulk, bulk changes the spaces between filaments. In polyester and nylon, spindle temperature and draw tension during false twisting create different crystallinity, so a given end takes more or less dye. |
| 3 | Blend ratio drift (poly/cotton, nylon/spandex, wool/poly) | A one or two point shift inside the same lot changes uptake noticeably. With two dye classes, each one develops its own band. |
| 4 | Fibre quality variation — cotton maturity, immature and dead fibre content, short fibre | Immature cotton has a thinner wall and a different amorphous fraction; it takes dye fast and looks pale. Dead fibre does not dye at all and reads as a white streak or a mottled patch. |
| 5 | Residual oil, size or wax, unevenly distributed | Local residue repels or retards dye. Where pretreatment fails to remove it, the result is a pale band, most common in sized woven greige. |
| 6 | Coloured fibre contamination — melange yarn, dope-dyed fibre in a natural lot | Cannot be removed by pretreatment; produces a permanent band. |
| 7 | Moisture regain variation, local damp or mould | Regain changes the rate at which dye is adsorbed; damp or mouldy areas dye differently and read as bands or patches. |
3.2 Weaving, knitting and greige
# | Cause | Mechanism and what you see |
| 8 | Uneven warping or beam tension | Different tension per end gives local differences in density and weight per square metre, so the amount of fibre per unit area changes and dye uptake follows it. The band sits at a fixed position on the beam and repeats in every piece — the classic "weaving streak". |
| 9 | Knitting feed tension fluctuation, mismatched feeder lengths | Higher feed tension gives smaller loops and a tighter surface, which reads paler. Worn feed wheels on circular, flat and warp knitting machines produce periodic bands. |
| 10 | Uneven needle or reed density, worn machine | Needle pitch and reed spacing set the density directly; worn machines lose concentricity and the band becomes periodic. |
| 11 | Greige storage — heavy stacking, local damp, long compression | Compressed areas do not wet out evenly in pretreatment; damp areas develop mould and pH drift. |
| 12 | Local density or weight deviation — drawing-in errors, wrong end or pick | A structural difference cannot be dyed away; only weaving and fabric inspection can intercept it. |
3.3 Pretreatment — the most overlooked, and a frequent creator
| # | Cause | Mechanism and what you see |
| 13 | Incomplete or uneven desizing | Residual size blocks dye and shows as a pale band. Size distribution was already uneven (unequal squeeze-roll pressure); desizing only leaves it in place. |
| 14 | Uneven scouring — alkali concentration, temperature, time or liquor ratio | Where wax and pectin remain, wettability is poor and uptake slow. The band edges are soft and blurred, and absorbency tests vary across the width. |
| 15 | Uneven mercerising | ny variation in alkali concentration, tension or washing-off changes swelling and orientation, and therefore the accessible regions for dye. Very obvious, and not repairable. Most common on cotton. |
| 16 | Residual peroxide or alkali, inadequate rinsing, drifting pH | Residual alkali hydrolyses reactive dye early; residual peroxide destroys it. Both give irregular pale or off-tone bands. pH drift at the end of pretreatment is the most common invisible cause. |
| 17 | Unequal wet pick-up left to right on a continuous range | Unequal squeeze-roll pressure leaves more liquor on one side, so the actual alkali concentration and temperature differ downstream, producing a band at a fixed position. |
Pretreatment streaks share a signature: blurred edges, greater width, and a position fixed by the machine — squeeze roll, guide roller, bath. When the band is wide and soft, look at pretreatment before looking at dyes.
3.4 Dyeing — the amplifier
| # | Cause | Mechanism and what you see |
| 18 | Ramp too fast, starting temperature too high | Dye exhausts heavily before the fibre has fully swollen, too fast to level. This is the first reason the same greige streaks in one process and not in another. |
| 19 | Salt, alkali or acid added in one shot | A local concentration spike drives dye onto the nearest fibre and leaves a gradient across the piece. Reactive dye with alkali and acid dye with acid are the most sensitive. |
| 20 | Low liquor ratio, weak circulation, blocked nozzle or filter | Liquor is not renewed at the fabric surface; concentration differs between layers and between areas. A blocked nozzle leaves a band at a fixed position. |
| 21 | Mismatched exhaustion curves in a combination, too many dyes | The fastest dye takes the sites and the rest cannot catch up, so shade separates across the width. Risk rises sharply above three components. |
| 22 | Poorly dissolved, agglomerated or unfiltered dye | Undissolved particles sit on the fabric or on machine surfaces and give spots and bands, usually alongside streaking. |
| 23 | Wrong levelling or retarding agent, or too little of it | Without something to hold the dye back, the rate of uptake is decided entirely by the greige's own variation. |
| 24 | Uneven tension and layer pressure in jig or beam dyeing | Where winding tension is high, penetration is poor; inner and outer layers, and selvedge and centre, take dye differently, producing regular bands. |
| 25 | Over-vigorous predrying on a continuous pad range — migration | Rapid evaporation carries dye to the surface; areas that dry faster end up richer in dye and read as bands. Specific to continuous ranges. |
| 26 | Scale, oligomer and tar deposits in the machine | Deposits travel with the liquor and land on the fabric as irregular dark bands or spots. |
| 27 | Sensitive shade stacked on a marginal greige | Deep, multi-component and neutral shades expose the greige most clearly. Navy, black, olive, khaki, mid-grey and beige are the usual suspects. |
3.5 Finishing and utilities
| # | Cause | Mechanism and what you see |
| 28 | Uneven stenter temperature, air speed or tension | Local overheating causes thermal migration of disperse dye and a shade shift; uneven tension changes density and reads as a band. |
| 29 | Local pressure variation in calendering or stentering | A damaged calender bowl or mis-synchronised stenter chain leaves a band at a fixed position with a different lustre. |
| 30 | Hard water, iron or copper ions | Metal ions complex with dye and catalyse peroxide decomposition, giving local shade shift or even holes. Most obvious when the water source changes. |
| 31 | Wet steam, fluctuating steam pressure | Condensate enters with direct heating and drops the local temperature, so uptake differs. |
3.6 Fibre-specific sensitivity
| Fibre / fabric | Where it is sensitive | How it shows |
| Cotton and blends | Maturity, dead fibre, uneven mercerising, incomplete desizing | Pale bands and mottling; mercerising streaks cannot be repaired |
| Polyester (filament, DTY) | False-twist temperature and draw tension, crystallinity, worn spinnerets | Dense fine bands in deep shades (navy, black), mostly pale streaks |
| Nylon, including nylon/spandex | Number of amine end groups, differing heat history | Highly sensitive; clear dark and pale bands with acid dyes, hard to cover |
| Wool and wool blends | Fibre diameter distribution, scale damage, uneven felting | Streaks and tone bands, usually with a hand-feel difference |
| Elastomeric fabrics | Spandex tension, covering process, preset temperature | Longitudinal streaks plus density bands; panels recoil differently after cutting |
4. Preventing the streak
Prevention is a system of multiple interception points, not a recipe adjustment at one machine. The five gates below are ordered by cost, cheapest and most effective first.
4.1 Gate one: yarn receiving
One lot, one bath. Every lot documented. Test before you feed.
• One yarn lot per dye lot. Same spinner, same lot number, same production date. A change of lot requires a fresh lab dip; if lots cannot be matched, dye them in separate baths rather than gambling on a blend.
• Keep a lot register. Lot number, supplier, production date, composition and blend ratio, twist, denier, evenness CV, hairiness, moisture regain. This register is the only evidence available when a claim has to be settled.
• Knit-deck (sock-band) test — the most effective single defence against chemical streaks. Knit a short band from every package, string the whole lot into one continuous band, dye it in a sensitive shade in one bath, dry it and pull out the packages that dyed off-tone. This keeps "different-uptake" yarn away from the machine.
• Physical testing on receipt. Twist, denier, bulk, evenness and hairiness. A physical streak cannot be corrected in the dyehouse, so the only place to reject it is the goods-in door.
• Grade and segregate. Yarn that is off-spec but not scrap is marked and reserved for insensitive shades, lining or pocketing.
4.2 Gate two: weaving, knitting and greige
• Tension check sheet. Set and actual values for warping, feed and winding, recorded every shift, audited by the supervisor at a fixed frequency. Tension is the first cause of weaving streaks and the cheapest thing to check.
• Head-end trial dyeing. Cut a head sample one foot to three yards into the piece and dye it in the most sensitive shade before committing the run. Do not wait until several thousand metres are woven — by then the loss is irreversible.
• Grade greige and allocate accordingly. Sort greige into first, second and general quality; first quality goes to sensitive shades (navy, black, olive, mid-grey), general quality to insensitive ones. This is usually the real reason an experienced mill "seems to do nothing" and still has fewer streaks.
• Storage discipline. Segregate, avoid heavy stacking, keep dry, first in first out. Damp or long-compressed greige is processed separately.
• First-piece approval. On a lot change, machine change or article change, retain and trial-dye the first piece; keep the retention sample three months after shipment.
4.3 Gate three: pretreatment
• Desize fully. Measure residual size (≥95% removal is a common target; confirm against your own and your customer's standard). Residual size is a direct cause of pale bands, and size distribution starts uneven when the squeeze rolls are uneven.
• Hold four parameters constant — alkali concentration, temperature, time, liquor ratio. Add chemicals in portions after dilution, never as a single charge.
• Lock the mercerising parameters. Alkali concentration (240–260 g/L is a common range for cotton; reference only), tension and washing-off are managed as one set, with concentration checked during the shift. A mercerising streak cannot be repaired, only prevented.
• Kill peroxide, control pH. Use catalase after bleaching and neutralise to slightly acidic (pH 6–7 on delivery). pH drift is the invisible driver of reactive-dye streaks.
• Measure evenness. Take left, centre and right samples each batch and compare absorbency (drop test) and surface pH. If the spread exceeds the internal limit, the batch is not ready to dye.
• Check wet pick-up on continuous ranges. Verify squeeze-roll consistency with a nip impression or pressure paper at fixed intervals.
4.4 Gate four: the dyeing process
This gate does not remove the difference — it lowers the development intensity. The aim is to let dye go on slowly and evenly enough that the greige's small variations are never amplified into a band.
(1) Recipe and dye selection
• Trial-dye the actual greige lot. Confirm the recipe on a lab sample of the greige in front of you, in the most sensitive shade. This is the last chance to expose a streak before the production bath.
• No more than three dyes in a combination, chosen for similar exhaustion curves. Prefer dyes with good levelling and coverage: among disperse dyes, E and SE types cover streaking better than S and SF types, whose higher molecular weight exhausts more slowly and lets the band show.
• Avoid high-substantivity dyes. High substantivity means fast, aggressive uptake and the least tolerance for greige variation.
• Change dyes as a set. Replacing one component shifts the tone and risks metamerism; re-dip the whole combination and re-check fastness.
(2) Ramp and dosing
• Start cold and ramp in stages, at 1–1.5 °C per minute (reference value; adjust for fibre and machine). Slow down further through the range where uptake is fastest — around 90–110 °C for polyester, and the fixation stage for reactive dyes.
• Dose salt, alkali, acid and accelerants in portions, with enough circulation between additions. Never dump.
• Hold at temperature. A longer hold after exhaustion lets dye migrate inside the fibre and level out, which visibly reduces pale bands.
• Run polyester hotter (135–140 °C, reference value). Greater swelling of the amorphous regions fills in the differences in accessibility, and coverage improves markedly. Confirm the vessel's pressure rating and safety valve condition first.
(3) Machine and circulation
• Guarantee circulation. Pump flow, nozzle pressure and rope speed matched to the load; clean filters every batch and remove scale and oligomer from the vessel at fixed intervals.
• Do not exceed the load limit. Overloading increases layer pressure and starves the liquor of access — the most common self-inflicted streak.
• Jig and beam dyeing. Alternate winding direction, keep tension uniform, and avoid inner-to-outer and selvedge-to-centre differences.
• Continuous pad ranges. Verify left-to-right roll pressure, predry gently without direct high-velocity air, and use an anti-migration agent where necessary.
(4) Auxiliaries
• Levelling and retarding agents are matched to fibre and dye class. Their job is to slow uptake and encourage migration, not to mask a streak.
• Streak-covering agents (carrier type) are a last resort. They work by swelling the fibre further, but they are heat-sensitive, tend to cause carrier spots and dye agglomeration (tarring), and add cost and effluent load. If the process can solve it, do not let an auxiliary do it.
4.5 Gate five: inspection and judgement
• Fix the viewing conditions. D65 light cabinet, 45/0 geometry, consistent illuminance and background. A streak looks different under different sources, so comparison must always happen under the same one.
• Eyes first, instrument second. A streak is a local band; a spectrophotometer averages it away and often reports "no difference". Measure the band and the adjacent ground separately and compare the two readings.
• Internal limits, for example: band versus ground ΔE ≤ 1.0 (tighten to 0.8 for sensitive shades), grey scale for change ≥ 4. Confirm against the value agreed with the customer.
• Retain samples every batch — left, centre, right, head, middle and tail — for three months. The retention is the only physical evidence available when a claim arrives.
• Add side lighting at inspection. Physical streaks hide under direct light and appear under low-angle side light; the inspection table should have an adjustable side lamp.
4.6 Disposition of fabric that already streaks
Not every streak can be saved and not every streak means scrap. Grade it and decide, rather than either writing off the lot or pushing it into first quality.
| Degree | Judgement | Disposition |
| Very slight | Visible only in side light; ΔE within the internal limit | Release, or divert to lining and pocketing with the customer's written agreement |
| Slight | Visible in normal light, band paler than ground | Shade correction ("topping") works on pale bands and does not work on dark ones; re-test fastness afterwards |
| Moderate | Band clearly visible, customer will not accept | Strip and re-dye: assess strength loss and tone shift, lab-dip first; only for strip-able dye classes |
| Severe | Wide, dark, running the full piece | Downgrade; divert to print, coating or yarn-dyed qualities that hide it; or cut around the band |
| Never | Any degree | "Pressing out" a streak with stentering, softening or calendering and shipping it as first quality — the band is still there and will surface after garment wash |
Hard line: reworked fabric is not counted as first quality and is not mixed into other lots until the customer has confirmed in writing. The cost of one concealment is usually a season of lost trust.
5. Diagnosis and accountability
What consumes time is not the correction but the question of whose problem it is. The five steps below give a direction within half an hour on the floor.
5.1 Five-step check
1. Unravel. Pull a single end from the band and from the adjacent ground and compare the whole length. If the entire end is darker or paler, the problem is in the yarn — spinning or false twisting.
2. Measure the width. One yarn wide: yarn. Tens of ends in groups: warping tension or needle and reed density. Several centimetres with blurred edges: pretreatment or squeeze rolls.
3. Check repeatability. Same position in every piece: weaving, because the position is fixed on the beam. Random position, different in every piece and every bath: dyeing or pretreatment.
4. Look at the edge. A sharp boundary points to a structural or yarn difference. A gradual boundary points to tension, circulation or a temperature gradient.
5. Trial-dye the greige. Take greige from the same lot and dye it alongside the problem piece in the same bath. If the streak reproduces, it is greige or yarn; if it does not, it is the dyeing process. This is the only step that settles the question with evidence.
5.2 Attribution table
| What you observe | Most likely stage | Why |
| Band one yarn wide; the whole end is darker or paler | Yarn — spinning or false twisting | Uptake follows the end, not its position in the fabric |
| Band sits at a fixed position on the beam and repeats every piece | Warping or feed tension | Tension difference creates a density difference |
| Band comes with a measurable density or weight difference | Weaving or knitting — needle, reed, machine | Structural; dyeing cannot remove it |
| Band lines up with a squeeze roll, guide roller or nozzle | Machine — pretreatment or dyeing | Geometry of the machine fixes the position |
| Severity differs between pieces of one bath and between sections of one piece | Mixed greige lots | Each piece has its own uptake behaviour |
| Only deep or sensitive shades show it; pale shades are clean | Dye combination plus greige variation | Development intensity and visual sensitivity acting together |
| Band spacing equals the plaiting pitch of the truck | Storage — air mark, aftertreatment | Regular spacing, repeatable, appears after setting |
| Streak disappears when the same greige is run in another vessel | Dyeing — that particular bath | Vessel condition, circulation, dosing practice |
5.3 Three rules for follow-up
Do not close the case without the cause. Do not close it without an action. Do not close it without verification. A streak is typically the sum of several causes, so a single recipe change usually reduces it rather than eliminating it. Every occurrence should leave a one-page record: greige lot, shade, band width and position, trial-dye result, action taken, result after re-dyeing. After fifty records, that file is a better reference than any textbook — it is your own mill's data.
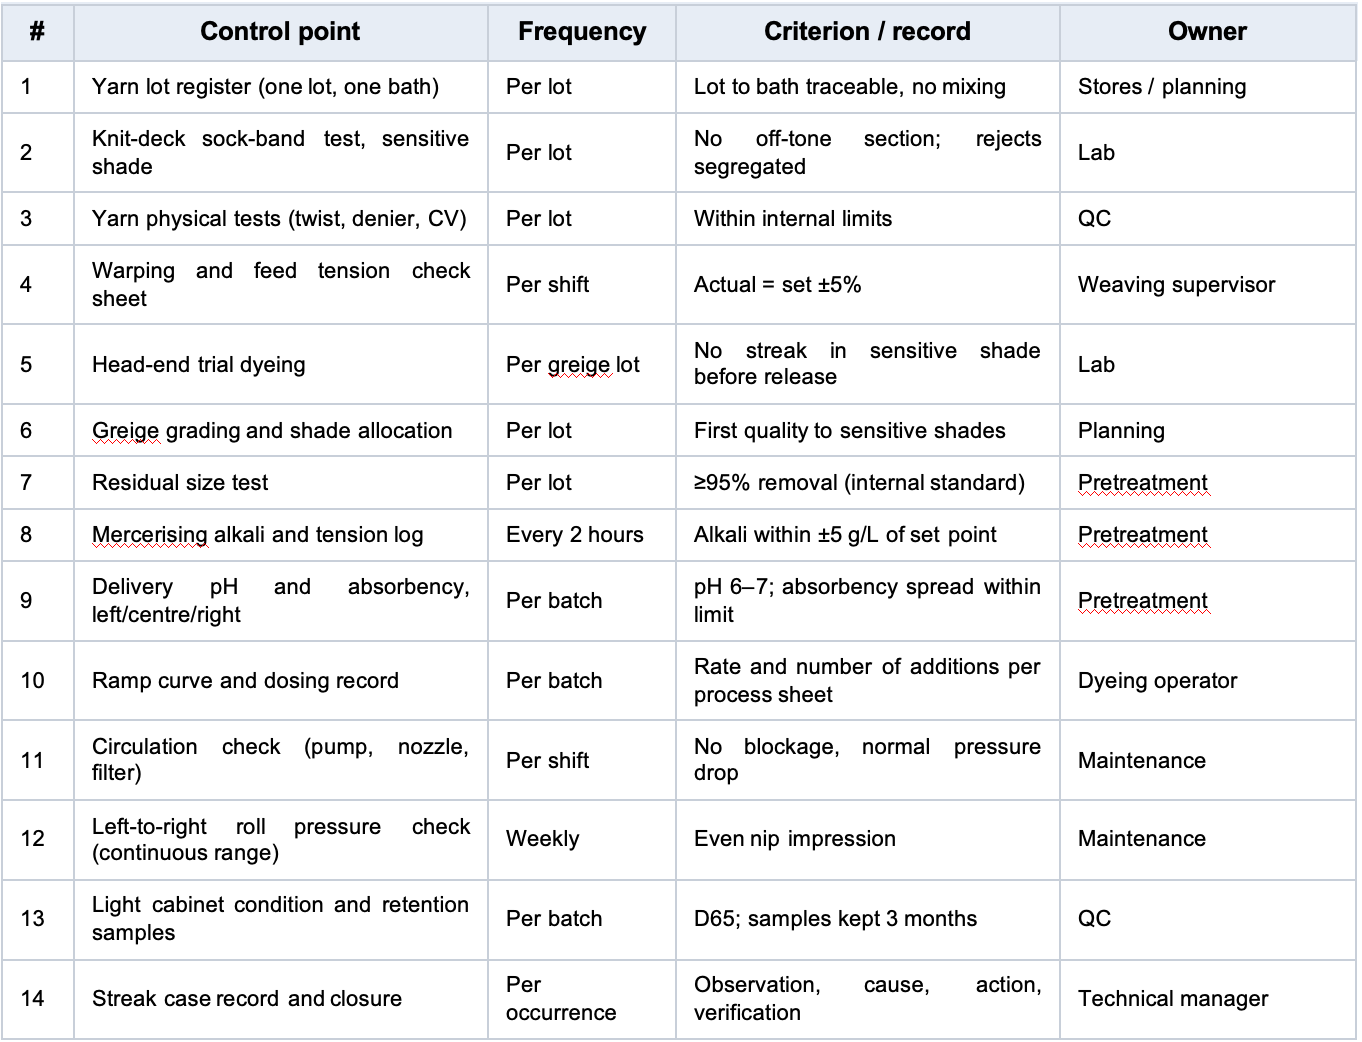
6. Shop-floor checklist
Print and post at the dyehouse; use it for the pre-shift meeting and for patrol inspection. Figures in the criterion column are common industry references and should be replaced with your own internal limits.
7. Closing
A streak is a difference, not a mistake. Nobody has to do anything wrong for it to appear: a yarn lot changes, a tension drifts half a setting, the ramp runs two degrees too fast. Chasing the person responsible will not solve it; intercepting the difference, one stage at a time, will.
Read the other way round, the same paragraph is a cost calculation. One knit-deck trial costs a few metres of yarn. Re-dyeing a bath costs several thousand metres and a week of delivery. A rejected shipment costs a customer. Preventing a streak is cheap; rescuing one is merely damage control.
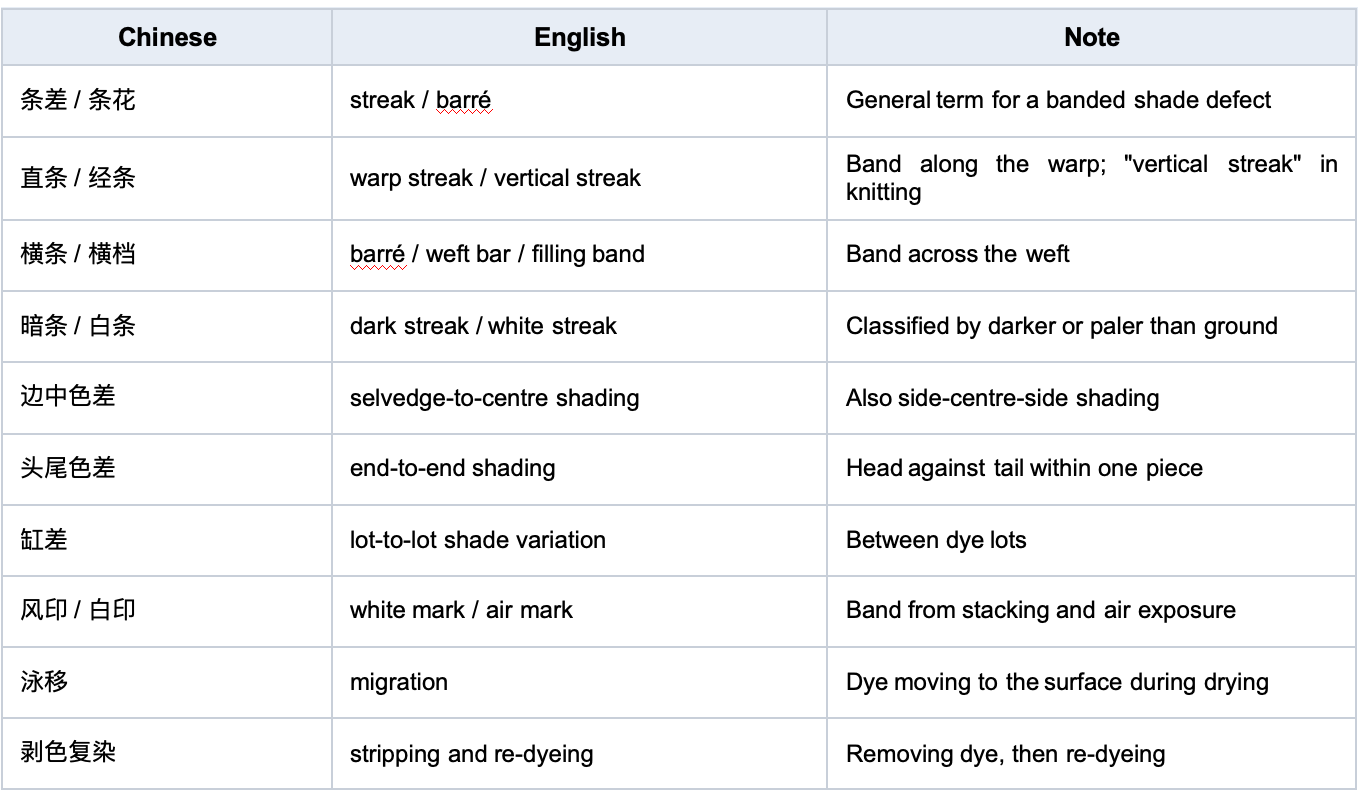
Appendix A. Terminology (Chinese / English)
Appendix B. Notes on use
• Parameters marked as reference (size removal, mercerising alkali, ramp rate, dyeing temperature, internal ΔE) are common industry ranges used to explain the logic of control. They are not a process sheet. Actual values must follow your own machine capability, fibre type and the standard agreed with the customer.
• Streaks are judged visually against a retained sample; instrumental measurement is supporting evidence only. Results change with light source and background, so the viewing conditions must be fixed.
• Causes are listed in process order. In production they usually combine; use the five-step check and a trial dyeing on the same greige rather than attributing the defect to a single step.

Jiede as one of the experienced apparel fabric manufacturer which can help you solve all your needs and problems in fashion fabrics.
CONTACT US
Contacts: Candy
TEL: 86-18158661662
Email: candy@jiedetextiles.com
WhatsApp: 86 18158661662
Address: Room 6068, Building 9b, China Textile City Creative Park, No.199 Chuangyi Road, Keqiao, Shaoxing, Zhejiang, China.